1) Open Visual Studio and create an ASP.NET website or create a new website
2) Open Access and create a database with at least one record
3) Save the file in the App_Data folder of the website
Ex. “\Visual Studio 2005\WebSites\web1-16\App_Data�?
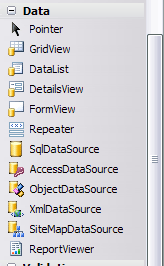
4) Open the toolbox and from the Data section of the toolbox, drag “AccessDataSource�? on the blank page.
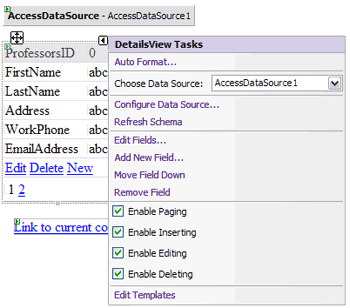
5) Configure the data source by left-clicking on the triangle on the data source and choose configure data source

6) Choose the database by browsing to it and selecting it.
7) Next configure the select statements by clicking “specify columns from table or view�? then clicking the “*�? button to select all attributes of the record. Then click the button to the right labeled “Advanced…�? to set up enable Insert, Update, and Delete features.
a. Click to select generate Insert, Update, and Delete Statements
b. Click to select use Optimistic Concurrency
9) Next click on the DetailsView Control from the Data tools and drag it onto the page.
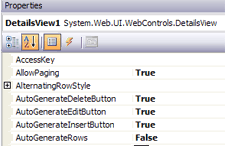
10) After you’ve configured the data source by selecting the Access Database on the details view, go to the Properties pane on the far right and set AutoGenerateDeleteButton, AutoGenerateEditButton, and AutoGenerateInsertButton to the value of True. By selecting True for those properties, you are allowing records to be deleted, edited, or inserted into the database.
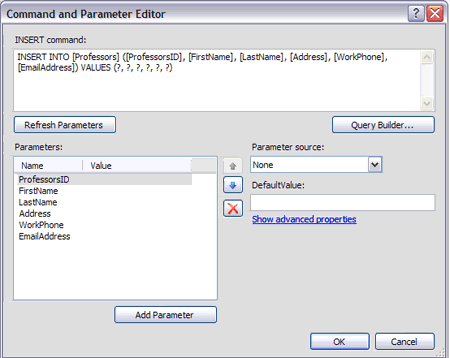
11) Click on the Access data source, then in the Properties pane click on InsertQuery (Query) to open the Command and Parameter Editor.
12) Remove the primary key from the query (for this example ProfessorsID) and also the corresponding question mark. Also be sure to highlight ProfessorsID on the Parameter listing below the statement, then click the red X to remove it from the listing.
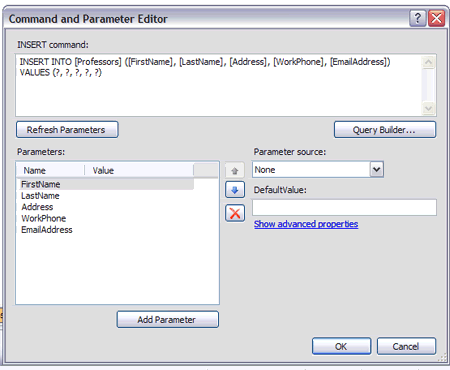
13)Then click OK.

Thank you! This was exactly what I was looking for — simple, understandable and easy.
I have literaly spent 4 days (non stop) trying to do this. And now everything works wonderfully, thanks to you!